
Log window from scratch: handy functionality and configuration (part 1)
Log window from scratch
- Introduction and motivation
- Basic window
- From standalone to class library
- Handy functionality and configuration (part 1)
- Handy functionality and configuration (part 2)
- C++ to C# interoperability
Welcome to a new entry in the Log window from scratch series, dear reader!
In the previous entry we converted our WPF window into a Class Library and created a host program that used it to display some sample messages. This time, we’ll expose some configuration to the host program and add some new functionality to the window. This way we can support several projects and make it more useful.
Ready? Set? Go!
Window position and dimensions
Let’s start with a simple one: setting the position and size of our window.
Imagine you are developing a game and it has a window where it gets rendered. You don’t want your log window to be created over it (or under it!), but side to side instead.
We could add two new methods to our LoggerUI called SetPosition and SetSize, or we could pass these parameters to the Initialize method and have them set from the start. For now, let’s pass them to Initialize since we don’t plan on resizing it programatically after it’s shown.
First, update Initialize like so:
public static void Initialize(int x, int y, int w, int h)
{
    Debug.Assert(m_instance == null, "LoggerUI already initialized");
    m_instance = new LoggerUI(new Rect(x, y, w, h));
}
So we can call it like so:
LoggerUI.Initialize(0, 0, 800, 200);Of course, we’d need to update our LoggerUI’s constructor to match the new parameter:
private LoggerUI(Rect dimensions)
{
    // application and window need their own thread, so we create it
    AutoResetEvent windowCreatedEvent = new AutoResetEvent(false);
    Thread t = new Thread(() =>
    {
        m_application = new App();

        MainWindow window = new MainWindow();

        // set window dimensions
        window.WindowStartupLocation = WindowStartupLocation.Manual;
        window.Left = dimensions.Left;
        window.Top = dimensions.Top;
        window.Width = dimensions.Width;
        window.Height = dimensions.Height;

        m_application.MainWindow = window;
        m_application.MainWindow.Show();

        // notify they are created before we block this thread
        windowCreatedEvent.Set();

        m_application.Run();
    });
    t.SetApartmentState(ApartmentState.STA);
    t.Start();

    // wait until the application and window are created
    windowCreatedEvent.WaitOne();
}
The only addition has been the block where we set the dimensions.
And this is it! We can now position and size it however we want.
Bonus idea: we could ask the window about these properties (which would be updated when resizing or moving the window) from the host program and persist its values so we could start from the last configuration when we launch the program again.
Auto-scroll to bottom
This will be the first addition that will modify our window’s layout.
If you were to use the window as it is now, you would notice the scroll isn’t moving unless you do it manually. This may be useful if you are reading some of the messages, but most of the time you may want it to scroll to the last message automatically.
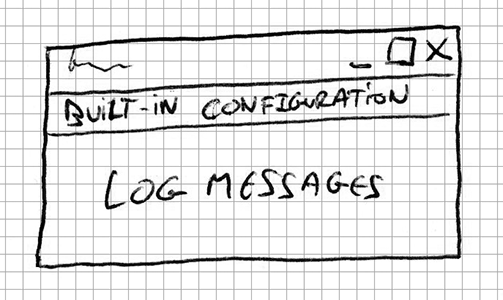
We’ll be adding a checkbox to our window that lets us activate or deactivate this functionality. This isn’t something the host program can choose to have or not, but something that’s built-in. So our layout will be something like this:
Layout update
Let’s start with the built-in block. This is the updated MainWindow.xaml file with some parts commented out for the sake of brevity:
<Window ...>
    <DockPanel>
        <GroupBox DockPanel.Dock="Top"
                  x:Name="BuiltInConfigurationGroup"
                  VerticalAlignment="Top"
                  BorderThickness="0">
            <CheckBox x:Name="AutoScrollCheckBox"
                      Content="Auto-scroll"
                      HorizontalAlignment="Right"
                      VerticalAlignment="Center"/>
        </GroupBox>
        <ListView DockPanel.Dock="Top" ...>
            <!-- other properties -->
        </ListView>
    </DockPanel>
</Window>
As you can see, we’ve wrapped everything into a DockPanel which allows us to resize the window and keep every control stretched as we want while keeping some parts fixed. This is how it looks:
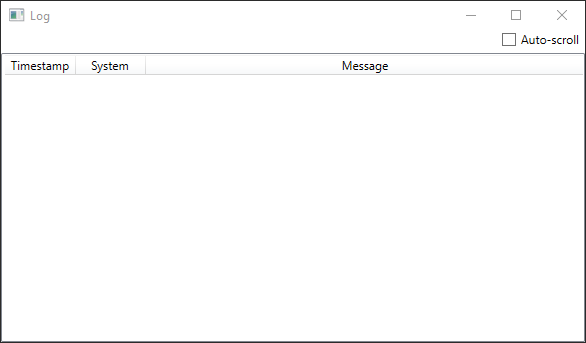
Auto-scroll property
Now we have to connect that checkbox to some ViewModel. We’ll update its XAML definition as:
<CheckBox x:Name="AutoScrollCheckBox"
          IsChecked="{Binding Path=IsAutoScrollEnabled}"
          Content="Auto-scroll"
          HorizontalAlignment="Right"
          VerticalAlignment="Center"/>
With that, we’ve tied a yet-to-be-created variable called IsAutoScrollEnabled to our checkbox. Let’s add it in our MainWindow.xaml.cs class:
private bool m_autoScrollEnabled = false;
public bool IsAutoScrollEnabled
{
    get
    {
        return m_autoScrollEnabled;
    }

    set
    {
        m_autoScrollEnabled = value;
        AddLogEntry(0.0f, "INTERNAL", "Auto-scroll is now " + m_autoScrollEnabled);
    }
}
If you were to do this, it wouldn’t work because we’re trying to bind a variable from a DataContext that’s null by default. To fix that we must do this in the MainWindow.xaml.cs’s constructor:
DataContext = this;Now it will work as expected.
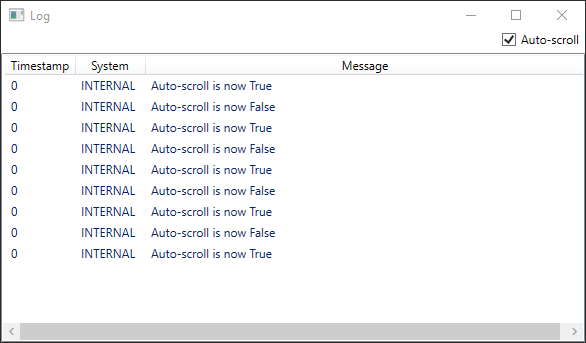
For now, we’ve used our own log capability to show a message in the window whenever we modify the property. If we were to run it and click on the checkbox several times we’d get something like this:
Scroll to bottom
By default, when a new item is added to the ListView that contains our log messages no scroll is performed. We’d want to know when an item is added to the list so we can perform the scroll ourselves.
Our LogEntries variable (which is an ObservableCollection) has a CollectionChanged event handler we can subscribe to. So, first of all let’s create a method in our MainWindow.xaml.cs to handle the scroll:
private void OnLogEntriesChangedScrollToBottom(object sender, NotifyCollectionChangedEventArgs e)
{
    if (!IsAutoScrollEnabled)
    {
        return;
    }

    if (VisualTreeHelper.GetChildrenCount(LogEntryList) > 0)
    {
        Decorator border = VisualTreeHelper.GetChild(LogEntryList, 0) as Decorator;
        ScrollViewer scrollViewer = (ScrollViewer)VisualTreeHelper.GetChild(border, 0);
        scrollViewer.ScrollToBottom();
    }
}
Basically, we ask the LogEntryList ListView for its children, get the scroll control for the list and ask it to go to the bottom. We can also check the NotifyCollectionChangedEventArgs to know whether it was triggered because an item was added or deleted, if we wanted to.
Now, to tie it with our checkbox, add this:
LogEntries.CollectionChanged += OnLogEntriesChangedScrollToBottom;We can now, also, refactor IsAutoScrollEnabled with just this:
public bool IsAutoScrollEnabled { get; set; }Congratulations, you’ve got an auto-scrolling ListView!
Per system filters
So far the new features are great additions, but how about being able to filter messages by their system?
Imagine you’re working on program and there’s some bug you’re tracking down related to the net communication. Wouldn’t it be awesome to filter out everything else and only read the logs for that system? Something easy like clicking on different checkboxes?
However, the goal of this log window is to be used in more than a single project and each one of them may have completely diferent systems. So, how do we do it?
Configuration from the host
Remember our LoggerUI entry point? We’re adding a new method to let the host program tell us which systems it will be using so we can create as many checkboxes. This could be the outline:
public void ConfigureSytems(List<string> systems)
{
    Debug.Assert(m_application != null);

    m_application.Dispatcher.BeginInvoke((Action)delegate
    {
        Debug.Assert(m_application.MainWindow != null);

        (m_application.MainWindow as MainWindow).ConfigureSystems(systems);
    });
}
Of course, MainWindow.ConfigureSystems doesn’t exist, so we must create it. But first, let’s think about what we need at the Window level.
We’re going to have a list of checkboxes, one for each system we’ve received and we want to know whether they are checked to filter the messages. Phew! Let’s digest all that.
ViewModel
We could have a new ViewModel called LogSystem which contains the name of the system (as received from the host) as well as the state of the checkbox we’ll present to the user. Something like:
public class LogSystem
{
    public string Name    { get; set; }
    public bool   Enabled { get; set; }
}
And this way, we can have a List<LogSystem> (or ObservableCollection<LogSystem>) in our MainWindow that contains all of the entries. By having that, we could have MainWindow.ConfigureSystems do this:
public void ConfigureSystems(List<string> systems)
{
    systems.ForEach((system) =>
    {
        LogSystems.Add(new LogSystem
        {
            Name = system,
            Enabled = true
        });
    });
}
Filtering
Remember LogEntries? The List<LogEntry> where we store all of the log messages we receive? Well, we want to filter it now. To do that, we’ll create a new ICollectionView from it.
An ICollectionView lets us sort, filter or group data from a given collection via predicate. This predicate is a function that decides, for each element in the collection, whether it belongs to the filtered data.
By the way, don’t let the View part of the name fool you. This doesn’t have anything to do with visual representation, it’s just the way to call this kind of filtered collection.
So, we’ve got to create it in our MainWindow:
private ICollectionView FilteredLogEntries;And initialize it:
FilteredLogEntries = CollectionViewSource.GetDefaultView(LogEntries);
FilteredLogEntries.Filter = LogEntriesFilterPredicate;
As you can see, we take LogEntries and create a view of the data. By the way, you may want to transfer the CollectionChanged event to this one so we apply the scroll when this one changes and not the unfiltered one. Then we assign our filter, which looks like this:
private bool LogEntriesFilterPredicate(object item)
{
    LogEntry entry = item as LogEntry;

    // filter out systems
    if(LogSystems.Any(s => s.Name == entry.System && !s.Enabled))
    {
        return false;
    }

    return true;
}
In other words, we keep any LogEntry unless the matching LogSystem is disabled.
This implementation has an unexpected behavior at this point, but let’s continue and discover it later on.
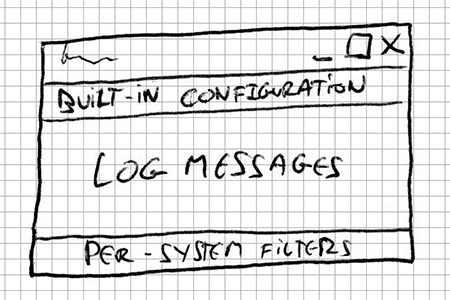
Layout update
We said we’d like to have as many checkboxes as systems so we could filter them to fit our needs. So, we need to add them somewhere. Maybe… to the bottom like this?
For that, and again skipping some of the XML attributes, we have to update our layout to this:
<Window ...>
    <DockPanel>
        <GroupBox ...>
            <CheckBox ... />
        </GroupBox>
        <GroupBox DockPanel.Dock="Bottom"
                  VerticalAlignment="Top"
                  BorderThickness="0">
            <ListView Name="Systems"
                      ScrollViewer.HorizontalScrollBarVisibility="Disabled"
                      BorderThickness="0">
                <ListView.ItemsPanel>
                    <ItemsPanelTemplate>
                        <WrapPanel Orientation="Horizontal"></WrapPanel>
                    </ItemsPanelTemplate>
                </ListView.ItemsPanel>
                <ListView.ItemTemplate>
                    <DataTemplate>
                        <CheckBox Content="{Binding Name}"
                                  IsChecked="{Binding Enabled}">
                        </CheckBox>
                    </DataTemplate>
                </ListView.ItemTemplate>
            </ListView>
        </GroupBox>
        <ListView x:Name="LogEntryList"
                  VerticalAlignment="Stretch"
                  HorizontalAlignment="Stretch">
        </ListView>
    </DockPanel>
</Window>
And remember to set the ItemsSource of the Systems element!
And this is how it would look like:
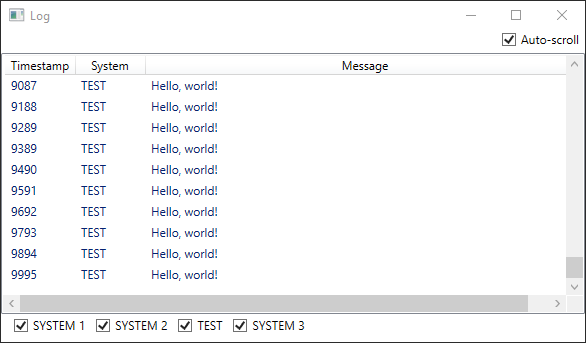
Impressive, isn’t it? Except it has a bug.
Testing filter
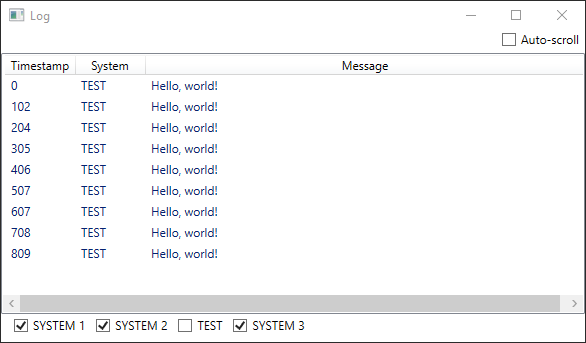
If you asked me, before even executing the log window, What should it do if I disable the TEST system for a while and then enable it? I’d say it would be silent for that while and then all the muted messages would pop at once. Do you mind if we test it now?
First, let it show some messages then disable the TEST system:
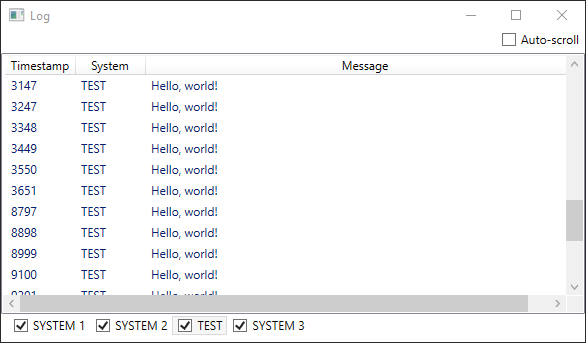
After 5 seconds, let’s enable it again.
Can you spot the issues?
The first screenshot shows how we wanted to filter out the messages with the TEST system but the ones before we disabled it are still there.
The second one shows how the messages between timestamps 3651 and 8797 are gone! It’s like they weren’t registered at all! Why is that?
If you remember, we created an ICollectionView from the LogEntries list. When we created it, the filter was executed and it’s executed again when a new LogEntry is added to the original LogEntries collection.
When we disabled the TEST system, new items didn’t fulfill the predicate but we didn’t re-evaluate it for the existent ones. When we enabled it again, only the new ones are evaluated and not the ones that were discarded while it was disabled (although they were still stored in the LogEntries list).
So, how do we fix this issue?
INotifyPropertyChanged
We’ve seen how our LogSystem.Enabled property was modified when we interacted with the checkbox. Our goal is to re-evaluate the filter whenever this happens so it’s applied to the whole LogEntries.
To do this we need to allow whoever is interested to listen to changes in our Enabled property. WPF has an interface called INotifyPropertyChanged that lets us execute an event whenever this happens. We’d have to refactor our LogSystem class as:
public class LogSystem : INotifyPropertyChanged
{
    public event PropertyChangedEventHandler PropertyChanged;

    public string Name { get; set; }

    private bool m_enabled;
    public bool Enabled
    {
        get
        {
            return m_enabled;
        }

        set
        {
            m_enabled = value;
            if(PropertyChanged != null)
            {
                PropertyChanged(this, new PropertyChangedEventArgs("Enabled"));
            }
        }
    }
}
When inheriting from this interface we have a new event handler called PropertyChanged that lets others listen to the changes we decide to trigger.
Remember our MainWindow.ConfigureSystems method where we created our LogSystem entries? That’s where we’ll subscribe to changes.
public void ConfigureSystems(List<string> systems)
{
    systems.ForEach((system) =>
    {
        LogSystem entry = new LogSystem
        {
            Name = system,
            Enabled = true
        };

        entry.PropertyChanged += OnSystemEnableChanged;

        LogSystems.Add(entry);
    });
}
The new OnSystemEnableChanged would look like this:
private void OnSystemEnableChanged(object sender, PropertyChangedEventArgs args)
{
    FilteredLogEntries.Refresh();
}
Refresh recreates the view by re-evaluating the predicate against the source collection. This way, when we disable the TEST system we’ll have an empty list and when we re-enable it we’ll have all items even when we weren’t seeing them.
Great job! Now you’ve got filters by system in an auto-scrolling ListView!
We’ve gone through some useful functionalities for our window, but we’re missing an interesting one: log levels with colors!
Mind joining me in the next post of the series to complete it?
Thanks for reading!
Log window from scratch
- Introduction and motivation
- Basic window
- From standalone to class library
- Handy functionality and configuration (part 1)
- Handy functionality and configuration (part 2)
- C++ to C# interoperability