
Memory Management in C++: introduction and design
Memory Management in C++
- Introduction and design
- First steps
- Allocation
- Deallocation
Gather around the fire, for I’m about to tell you a short tale about Learning.
Some time ago I was rolling my own take on some of the containers of the C++’s STL. They were simplified versions of the originals, just focusing on the bare-bones. Why did I do it? In videogames, it’s common that people skip using the STL altogether and build their own versions of the containers (check EA’s STL for reference) because the STL’s are overengineered and most of the underlying features aren’t strictly necessary in that context.
When I was building the very first one (a Singly Linked List), I was trying to understand the STL itself as well. I started investigating the Allocator, which is a parameter of the containers defined in the STL. This Allocator is a class that deals with how dynamic memory requirements are fulfilled (i.e. used when creating new nodes in a list). So, of course, I wanted to mimic this behavior.
I went on and created a copy of the default Allocator: it forwarded memory requests to new and delete. Not bad, as I could create other allocators that obtained that dynamic memory from other source instead of asking for it to the OS directly.
That source, in this case, was a custom Memory Manager. It was a rather naive one, just a Proof of Concept (but it worked!). I learned a lot while doing it but I realize I barely scratched the surface. However, I wanted to share with you what I found, so this series of posts will go step by step through building a simple Memory Manager in C++ and we’ll be keeping an eye on what we need to implement it.
Why do you need a Memory Manager?
In C++, each time you need dynamic memory you use new (malloc in C), some memory is allocated on the heap and you get a pointer to it. When you’re done with it, you use delete (free in C) and the memory is returned to the place it came from.
While doing that, you are in fact calling the OS. It is, in turn, switching contexts between your application and the kernel to fulfill your requests. And that’s each time you call new and delete! We’re talking about tiny fractions of a second on each context switch, but they will stack if you are performing them continuously.
Edit: thanks to @FlohOfWoe and @dcanadasm for pointing out that not all calls to new and malloc result in a call to the OS.
Long story short, new and malloc are runtime library calls that perform some memory management under the hood, somewhat similarly to what we’re trying to achieve with our manager. They might need to perform a call to the low-level API (still not OS) to obtain the memory the user requested. In case it is out of memory, it will perform a call to the OS and retrieve a full memory page (bigger than the memory that was requested). Then, this memory page is sliced into smaller chunks and managed by the runtime library. The idea is to minimize context switches, that are considered slow.
Check this answer on StackOverflow for more info.
Back on track, this concept might not seem like a big deal for the majority of the programs. However, some high-performant ones do require memory management to be consistent: you don’t want to have a sudden hiccup because your allocation required an OS call. Videogames are one of this kind of programs, and these OS calls can be specially slow in consoles or other devices than computers.
What’s the idea?
Okay so, from what I know, the most common strategy when building a Memory Manager is to allocate a big chunk of memory on a single call on the early startup of the application. Maybe you have several chunks, maybe some of their sizes are fixed, maybe some are dynamic. But the idea is similar.
During the execution of said application, all the calls to new and delete are redirected to the Memory Manager in some way (the Allocator is one option), which acts on the previous big memory chunk. Think of it as if it was the OS handling which memory is being allocated, but it’s always working on the user space instead of the kernel space so no context switch is performed in the worst case.
When the application is closing, the big memory chunk is returned to the OS and no memory is leaked in the process.
Benefits
Let’s summarize them into this list:
- Profiling and tuning: because you know which allocations are being made you can extract some statistics on which memory sizes are being requested the most, which is your memory usage peak, whether you’re running out of memory or identify code that uses more memory than it really needs to.
- Full control of the memory: you’re responsible for dealing with the memory layout yourself, so you can decide how you partition it, which memory is returned to the user and what to do with the one you recover.
- Potential performance improvement: we’ve claimed the calls to the OS can be slow in certain scenarios. If you deal with your memory in a nice way you can avoid calling the OS and with it, improve performance.
- Fragmentation control: this one is probably a mix of the previous two. Because you know how the memory is laid out and the life time of the chunks, you could try to minimize fragmentation by combining neighbouring free ones, have fixed sized chunks that exactly fit the user’s memory requirements, or pack allocations that last for the same amount of time in a common chunk and then deallocate them altogether, for example. This is a very advanced topic that we won’t cover in depth in the series.
- Debugging: you can add debug information to user’s allocations. For example, at the cost of extra memory, you could store the file and the line from which the allocation was made and track memory leaks down. Or you could include guards on each allocations to find memory stomps. Or you could include an identifier of the sub-system that requested the memory so you can know at any time which one is using more memory.
Goal of this series
With this series of posts I want to go through the progress of building a simple, single threaded Memory Manager. We’ll study how to add some debug utilities like the ability to dump the memory or setting certain bytes in memory to identify its state. We’ll also investigate different options on how to layout the big memory chunk, their pros and cons.
And, if we manage to outperform new and delete we’ll throw a party!
The Big Picture
Let’s try to understand the idea behind what we’re trying to achieve.
Trick of the trade
Before we begin, let me give you a free piece of advice that I find very useful. Something I learned some time after I started learning Computer Science. Something I was told when I started programming but I didn’t understand by then.
Whenever you want to build a system, take pen and paper and draw the system you want to end up having.
Draw it once, take notes. Thrash it because you noticed you were missing something. Start drawing it again, discover dependencies, interactions. Find out how you’re structuring your code. Be sure you know what you are building before you even open an IDE and start coding.
It’s useful to even find out how the user (that could be you) will interact with your system. What’s the top level API? Which classes/functions you can come up with?
That’s what we’ll do first, so we find out what we really want to build.
Definition
Okay, we want to build a Memory Manager. And what is a Memory Manager, you say?
Let’s define it as a system that can receive requests to retrieve and return arbitrary-sized chunks of memory from an existent memory pool.
That means that the typical use of the system would be to receive memory requests from a program, the program uses it to store data, transforms it and then returns it back to the system somewhere down the line.
The memory we deal with is finite, so subsequent memory requests will result in less available memory in the pool. Not returning it back to the system can make it run out of memory.
Top level API
Before we draw a diagram with how we’ll structure our system, let’s stop a second and think about how we want the user to interact with it. We need to expose some functions to the user so she can do what we just defined. We’re building it in C++, so we could define something like:
void *allocate(unsigned int bytes);
void deallocate(void *pointer);
With this, the user can do:
int *intPointer = static_cast<int *>(allocate(sizeof(int)));
*intPointer = 42;
deallocate(intPointer);
Alright, it’s a weird example, but we’ll try to understand it.
We take the sizeof(int), which results in a number of bytes (the ones it takes to store an int, typically 4 bytes in today’s architectures). Then we request that amount of memory to the Memory Manager. Because the allocate function returns a void * (pointer to anything) we need to interpret it as an int *, hence the static_cast<int *>.
Then we take the pointer to our int and update the memory it points to so it contains 42. Now we have a pointer that points to an int that has value 42.
Finally, we return the memory back to the Memory Manager and further uses of intPointer are undefined.
This is basically the same code:
int *intPointer = new int;
*intPointer = 42;
delete intPointer;
The difference is that we control the underlying memory instead of letting the OS deal with it.
Okay, so that’s the kind of thing we want our users to be able to do. Now let’s take pen and paper and start designing our system!
System design
One of the requirements we set ourselves was that the memory we manage is finite. That means the MemoryManager, somehow, has access to a chunk of the total available memory in the computer. Then, we slice it into chunks of different sizes based on what is requested. So, we need to keep track of all of the chunks we’ve sliced the memory into.
With all that in mind, we can think of our system as:
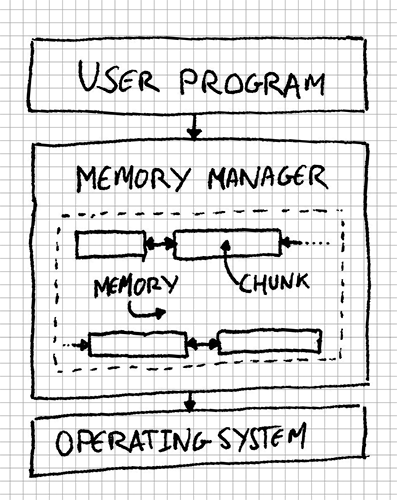
By drawing this picture we’ve discovered a new class for our system: the MemoryChunk. And we’ve also found some of the data it needs to have:
struct cMemoryChunk
{
    cMemoryChunk *m_previous;
    cMemoryChunk *m_next;
};
Each of these MemoryChunk instances is part of a chain of chunks. In fact, it stores a couple of pointers to the previous and next chunks in the chain. You might have noticed it looks like a Doubly Linked List. And you’re right. The MemoryManager would, then, have some kind of reference to the head of the list of chunks. We’ll see how, but it’s not via a MemoryChunk * as you might have thought!
One caveat: although the user requests memory in the form of a void * (check the API we defined), we’re building MemoryChunk instances internally. That means we’re using the MemoryChunk as kind of a container of the memory the user requests, storing internal data for the manager and returning to the user the memory that is contained in the chunk. It sure sounds complex, but we’ll go through it, don’t fear.
Knowing all this, we can finally start coding (yay!). But that will be in the next post in the series.
Thank you for reading, see you soon! :)
Memory Management in C++
- Introduction and design
- First steps
- Allocation
- Deallocation