
Log window from scratch: handy functionality and configuration (part 2)
Log window from scratch
- Introduction and motivation
- Basic window
- From standalone to class library
- Handy functionality and configuration (part 1)
- Handy functionality and configuration (part 2)
- C++ to C# interoperability
In the previous post we went through some interesting functionalities for our log window but we were missing the, arguably, most important one.
Should we start working on it? Oh yes, and you’ll love it.
Log levels
This wouldn’t be a proper log window if we didn’t have log levels (debug, warning, error) and colors for them!
Again, we’ll let the host program decide which log levels it uses, their names and even the colors. And yes, you’ve guessed right, we’ll do that in the LoggerUI singleton.
But before we start, what’s the relationship between different log levels? How about using the common one: each level represents an integer (higher means more severity). Like in this example:
Imagine we had three log levels: debug, warning and error. We could use debug to log data or flow, warning would let us know of non-blocking incompatibilities or to diagnose future issues and error would flag stuff that must be fixed although we managed to continue executing the program. If we set our current log level to warning, we would also see error ones because their severity is higher.
Oh, and for it to work we must remember to update our LogEntry messages to have a log level as well!
Configuration from the host
We’ve decided each log level is modelled as a name and a color. The severity can be implicit based on the configuration: the first ones are less important. What about adding this to LoggerUI:
public void ConfigureLevels(List<Tuple<string, string>> levels)
{
    Debug.Assert(m_application != null);

    m_application.Dispatcher.BeginInvoke((Action)delegate
    {
        Debug.Assert(m_application.MainWindow != null);

        (m_application.MainWindow as MainWindow).ConfigureLevels(levels);
    });
}
We could’ve created a new class or struct as the Model for each log level but we’ve used Tuple<string, string> instead to get to the point. The first string is the name, the second one is the hexadecimal representation of the color.
We could call it like so:
LoggerUI.Instance.ConfigureLevels(new List<Tuple<string, string>>
{
    Tuple.Create("DEBUG",   "#000000"),
    Tuple.Create("WARNING", "#B8860B"),
    Tuple.Create("ERROR",   "#FF0000")
});
Now, we’d have to create MainWindow.ConfigureLevels, but let’s create a new ViewModel before.
ViewModel
Similarly to the LogSystem one we created in the previous post, let’s define LogLevel as:
public class LogLevel
{
    public string Name  { get; set; }
    public Brush Color  { get; set; }
    public int Severity { get; set; }
}
Again, let’s have a new LogLevels list in our MainWindow to contain all of the levels. And we could populate it from this method:
public void ConfigureLevels(List<Tuple<string, string>> levels)
{
    for(int i = 0; i < levels.Count; ++i)
    {
        LogLevels.Add(new LogLevel
        {
            Name = levels[i].Item1,
            Color = (Brush) new BrushConverter().ConvertFromString(levels[i].Item2),
            Severity = i
        });
    }
}
You’ll understand why we’ve used Brush instead of Color in a moment.
Cool! Now we’ve got all of the values in a list. What’s next?
Add log level to LogEntry
Right, until now all of our LogEntry messages only had a timestamp, a system and the message itself. Now, we need to add the name of the log level it was logged with. I’ll let you go through this one, just add a new string property and we’re ready.
Layout update
We’ve established the relationship between log levels. Following our example, debug < warning < error. So, we only want to select the minimum level we’re showing and the ones over it should show as well. This looks like a radio button to me.
The layout of our window would look like this with this addition:
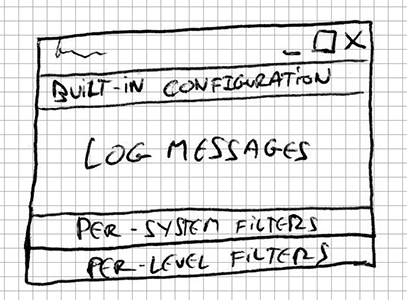
So, once again, let’s skip some XML attributes and update the layout:
<Window ...>
    <DockPanel>
        <GroupBox ... />
        <GroupBox ...>
            <StackPanel>
                <ListView Name="Systems" ... />
                <ListView Name="Levels"
                          ScrollViewer.HorizontalScrollBarVisibility="Disabled"
                          BorderThickness="0">
                    <ListView.ItemsPanel>
                        <ItemsPanelTemplate>
                            <WrapPanel Orientation="Horizontal"></WrapPanel>
                        </ItemsPanelTemplate>
                    </ListView.ItemsPanel>
                    <ListView.ItemTemplate>
                        <DataTemplate>
                            <RadioButton Content="{Binding Name}"
                                         GroupName="LogLevels"
                                         Foreground="{Binding Color}">
                            </RadioButton>
                        </DataTemplate>
                    </ListView.ItemTemplate>
                </ListView>
            </StackPanel>
        </GroupBox>
        <ListView x:Name="LogEntryList" ... />
    </DockPanel>
</Window>
The Foreground property expects a Brush instead of a raw Color, so that’s the reason why we used one.
Tweaking the sample messages a bit and taking a screenshots looks like this:
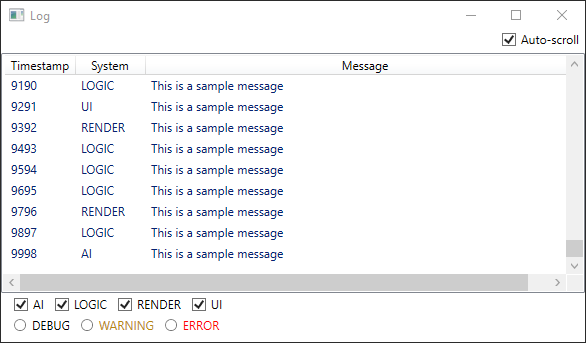
As you can see, none of the elements is checked. We’ll work on that soon. But first, let’s add some colors to the messages!
Message coloring
Now that all of the messages have a log level themselves, we could style the LogEntryList so each row has a color matching the configuration. That way, we can skip adding a new column with the name of the log level.
If all of our log levels and their colors were static resources we’d be defining them in XAML. Since we’re configuring it externally, we must create the styles programmatically.
To do that, let’s update our MainWindow.ConfigureLevels like so:
public void ConfigureLevels(List<Tuple<string, string>> levels)
{
    // create log levels
    for(int i = 0; i < levels.Count; ++i)
    {
        LogLevels.Add(new LogLevel
        {
            Severity = i,
            Name = levels[i].Item1,
            Color = (Brush) new BrushConverter().ConvertFromString(levels[i].Item2)
        });
    }

    // style ListView based on the data from the log levels
    Style logListStyle = new Style();
    logListStyle.TargetType = typeof(ListViewItem);
    foreach(LogLevel level in LogLevels)
    {
        DataTrigger trigger = new DataTrigger();
        trigger.Binding = new Binding("Level");
        trigger.Value = level.Name;
        trigger.Setters.Add(new Setter(ListViewItem.ForegroundProperty, level.Color));

        logListStyle.Triggers.Add(trigger);
    }

    LogEntryList.ItemContainerStyle = logListStyle;
}
A Style, as we can see, has the concept of a DataTrigger. It takes a Binding and a Value to test against, and if it matches then the Setters are applied. In our case just a text color, but we could use other styling. Finally, we assign the whole style to the ItemContainerStyle, which is the one applied to the ListViewItem entries.
This is the result:
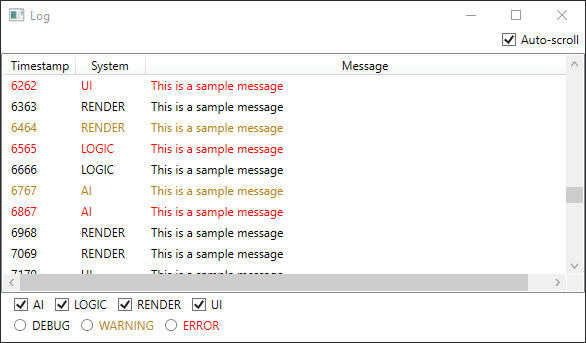
Looking nice, huh? However, there’s something missing, isn’t it?
Filtering
Alright, alright. We’re happy with the results but we still can’t do anything with these radio buttons! Let’s see what’s left.
We said we’d be adopting the usual each log level has a severity and we can show all of the logs with a higher severity level than the selected one. We’ve got as many radio buttons as log levels, and each one represents a severity (although we aren’t displaying the number itself).
So, it looks like we only want one variable: the currently selected log level. But, how do we go from many radio buttons to a single value?
First of all, let’s create a new variable in MainWindow:
public int CurrentLogLevelSeverity { get; set; }Now, let’s update our LogLevel class to this:
public class LogLevel : INotifyPropertyChanged
{
    public event PropertyChangedEventHandler PropertyChanged;

    public string Name     { get; set; }
    public Brush  Color    { get; set; }
    public int    Severity { get; set; }

    private bool m_selected;
    public  bool Selected
    {
        get
        {
            return m_selected;
        }
        set
        {
            m_selected = value;
            if (PropertyChanged != null)
            {
                PropertyChanged(this, new PropertyChangedEventArgs("Selected"));
            }
        }
    }
}
It looks pretty similar to LogSystem, doesn’t it?
Now, MainWindow.ConfigureLevels:
public void ConfigureLevels(List<Tuple<string, string>> levels)
{
    // create log levels
    for(int i = 0; i < levels.Count; ++i)
    {
        LogLevel entry = new LogLevel
        {
            Severity = i,
            Name = levels[i].Item1,
            Color = (Brush)new BrushConverter().ConvertFromString(levels[i].Item2)
        };

        entry.PropertyChanged += OnLevelSelectedChanged;

        LogLevels.Add(entry);
    }

    // [...]
}
So, whenever the LogLevel changes (when the user interacts with the radio buttons) we’ll get notified. And what do we do then?
private void OnLevelSelectedChanged(object sender, PropertyChangedEventArgs args)
{
    LogLevel level = sender as LogLevel;

    if(level.Selected)
    {
        CurrentLogLevelSeverity = level.Severity;

        FilteredLogEntries.Refresh();
    }
}
Because the Selected property will be modified for both the radio button that’s getting selected and the one that’s being deselected, we’re just interested in the former. We update the log level and ask the filter to be re-evaluated.
But, we must add the log level to the filter or it won’t do anything different!
private bool LogEntriesFilterPredicate(object item)
{
LogEntry entry = item as LogEntry;
// filter out systems
if(LogSystems.Any(s => s.Name == entry.System && !s.Enabled))
{
return false;
}
// filter out levels
LogLevel level = LogLevels.First(l => l.Name == entry.Level);
if(level != null && level.Severity < CurrentLogLevelSeverity)
{
return false;
}
return true;
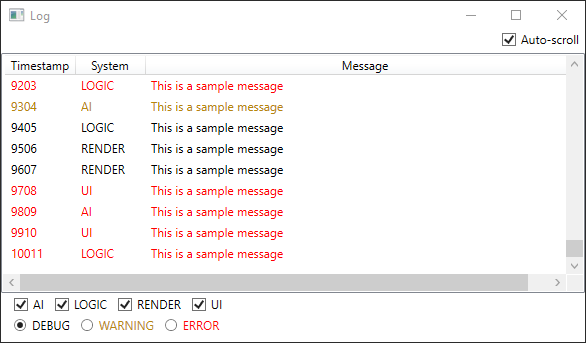
}Each message has the name of the log level it was logged with, and we have the severity we want to test against. So, we find out which LogLevel matches the given name and only keep those messages with a matching or greater severity. Bonus points if you can optimize this to prevent looking for the LogLevel.
And that’s it! Let’s take some screenshots!
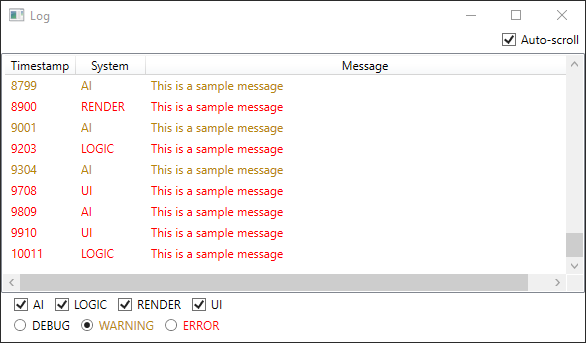
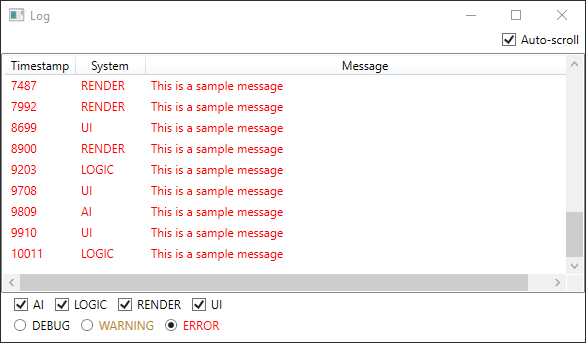
Not bad! But can we improve the layout so it looks better?
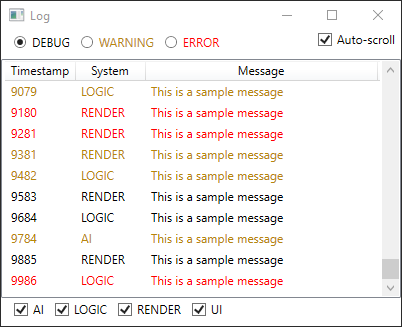
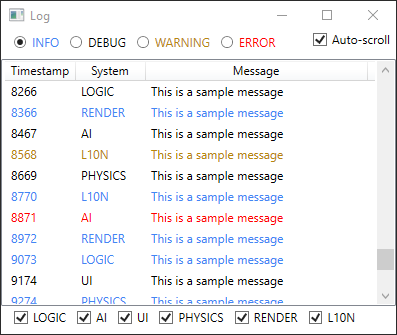
What about adding more systems and more log levels from the host program? Don’t cheat, you can’t modify the WPF project!
Congratulations, reader! You’ve got a configurable log window of your own! :)
Oh well, I guess that’s it! With this post and the previous one we’ve gone through some useful features: positioning, auto-scrolling, configuring log systems and log levels, filtering… Which other features you’d like to add? I encourage you to do it!
I hope this series helps you create your own version of the log window and use it in the future on your side projects!
In the next post we’ll see how we can have a C++ host program that uses this log window.
Thanks for reading!
Log window from scratch
- Introduction and motivation
- Basic window
- From standalone to class library
- Handy functionality and configuration (part 1)
- Handy functionality and configuration (part 2)
- C++ to C# interoperability